Pressure Vessels: Avoid Costly Design Mistakes
“Just build it to the Code.” That’s the most common response you hear during a design review that involves purchasing a new pressure vessel. Yet, there’re as many choices within the ASME code as there are when searching for your next vehicle. Smart choices can save you money during fabrication as well as over the lifecycle of the vessel. So, here, we’ll attempt to condense the 5,000+ pages (50+ lbs) of the ASME Boiler and Pressure Vessel Code, or “the Code,” as it’s affectionately known, into a simple guide when specifying vessels, heat exchangers and tanks. We’ll focus on 10 key factors.
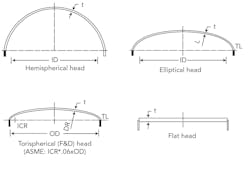
1. Inside diameter versus outside diameter. Process engineers often specify a vessel’s diameter based on inside diameter (ID) to ease volumetric calculations. This also will simplify fabrication/installation of internal hardware (e.g., support rings, trays, distributors, etc.). However, sometimes specifying a vessel based on outside diameter (OD) is better. For instance, after a purchase order is issued, heads are the first things ordered — obtaining off-the-shelf heads is more likely if specified by nominal pipe sizes (NPS), which is OD from diameters 14 in. to 36 in. (For thin-wall heads, i.e., 2-in. thick or less, choosing ID or OD makes little difference, while most heads more than 36 in. are custom made.) As heads get thicker, hot forming is necessary and dies are based on ID. Thick, hot formed heads can be OD ordered but require an extra manufacturing step.
In addition, specifying a vessel based on OD has advantages when the project is modeled using 3D plant design software. If vessel wall thicknesses change during project development, the adjustment is done to the ID keeping nozzle projections, bolt circles, steel design unaffected, etc.
2. Design pressure and temperature. Required wall thickness is more sensitive to pressure than temperature. Therefore, specifying a design pressure 100 psig over the maximum operating pressure is more costly than specifying a design temperature 100°F higher than what’s needed. A design pressure of 25 psig–50 psig above that at the maximum operating/upset condition and not less than 90% of maximum allowable working pressure is industry practice. Keep design temperature to no more than 50°F–100°F above that at maximum operating/upset conditions. Also, watch your design pressure and temperature so as not to cross into the next higher flange class. Check ASME B16.5 for design temperature and limitations for flanges.
3. Vacuum rating. Although current project needs may not require a vessel to be vacuum rated, over its lifetime, changes in feedstock, products and technology will occur. A large number of re-rates currently performed are on older vessels originally not documented for vacuum that now require it due to process changes. Many new vessels will rate for full vacuum and all for partial vacuum. So have the fabricator evaluate your proposed design for vacuum and apply it to the code stamp. With today’s software, this calculation can be easily performed and at no cost. You may get full vacuum rating without any modifications — if not, consider spending a little extra now by welding on a stiffening ring and a couple of re-pads to avoid having to go through the cumbersome re-rate process and field hydro-test down the road. (Check out this Plant Insites column, for more on the value of vacuum rating.)
5. Jacket choices. As with heads, consider functionality, not cost. Choosing the correct jacket is paramount to achieve process needs. The three common types — conventional, half-pipe and dimple — each offer advantages and disadvantages with respect to process parameters, reliability and cost [1]. Table 1 compares them.
9. Cyclic service. If a vessel will experience an unusual number of thermal or pressure cycles over its design life, this could result in premature fatigue failure (usually at a weld) unless preemptive measures are taken. Fatigue is cumulative material damage that manifests as a small crack and progressively worsens (sometimes to failure) as the material is repeatedly cycled. A 1985 survey showed that fatigue was the second most prevalent cause of failure in industry (25%), closely behind corrosion (29%); in the airline industry, it predominates (61%) [4].
It’s up to the purchaser to instruct the fabricator what design/fabrication practices to follow to avoid fatigue. Cyclic service is usually associated with batch processes and ASME [5] provides the following rules:
Design for fatigue if N1 + N2 + N3 + N4 ≥400 for non-integral (fillet weld) construction and ≥1,000 for integral construction (i.e., no load-bearing fillet welds), or 60 and 350, respectively, in the knuckle region of formed heads, where N1 is the number of full startup/shutdown cycles; N2 is the number of cycles where pressure swings 15% (non-integral) or 20% (integral); N3 is the number of thermal cycles with a temperature differential (ΔT) exceeding 50°F between two adjacent points no more than 2.5 (Rt)½ apart (where R is inside radius of vessel and t is thickness of vessel under consideration) —apply a two-times factor if ΔT exceeds 100°F, a four times factor if more than 150°F, and see Div. 2 for more than 250°F; and N4 is the number of thermal cycles for welds attaching dissimilar materials in which (α1-α2)ΔT (where α is the thermal expansion coefficient) exceeds 0.00034, or for carbon steel welded to stainless steel, the number of cycles where 2ΔT exceeds 340.
Equipment and piping in continuous processes also can experience fatigue due to the relentless mechanical loading/unloading of reciprocating compressors, piston pumps, bin vibrators or from vibration, etc., from any type of mis-aligned rotating equipment.
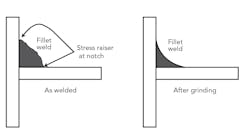
Fatigue failures in welded equipment most commonly occur in fillet welds where there’s an abrupt change in equipment geometry. Division 2 of the ASME Code designs around fatigue cracking in nozzles by limiting the use of fillet welds. However, fillet welds and sharp corners are ubiquitous in Div. 1 designs and can’t be avoided without cost.
• Length. Tubes are stocked in 20-ft lengths. Seamless tubes are made from individual billets or hollows and so can vary in length by one to two feet. The length of welded tubes is more exact because they’re produced from a continuous strip coil. The most wasteful and costly option for stocked tubes is ordering units just over 10 ft in length because nearly 50% of the tube is discarded. As tube count increases, direct mill orders become economically attractive; in such cases, any length tube can be supplied, if your schedule allows. Mills have minimum orders (i.e., 2,000 lb.–2,500 lb.), though “mini-mills” will take orders at half these quantities.
• Gauge. Tubes come in different wall thicknesses (or gauge). Industry standards [7] detail the appropriate wall thickness based on material type and service. Table 3 provides guidance for a ¾-in. tube where no prior service history is available.
The 45° or 90° pattern is selected if shell-side mechanical cleaning is required. Such a pattern also requires a removable bundle. The 45° is more common than the 90° because it provides more shell-side flow disturbance, which improves heat transfer. A 90° pattern is used to reduce pressure drop at the expense of duty and often is employed in boiling service to enable better vapor disengagement.
Make the right choices
In today’s chemical industry, too many engineers given the task of specifying welded equipment such as vessels, heat exchangers and tanks aren’t well versed in what’s necessary to develop an economic design that provides suitable safety and performance. Myriad choices must be made — and each will incrementally add to the final cost and schedule. When looking for savings, cutting the wrong corners may turn out to be very costly over the equipment’s service life.Chip Eskridge is technology manager -- mechanical/metallurgy with Worley. He also serves as chairman of ASME B31.3 Process Piping Code. Mike James is a senior consultant, materials engineering, for DuPont, Houston. Steve Zoller is director of fabricated equipment for Enerfab, Cincinnati. Reach them via e-mail at [email protected], [email protected] and [email protected].
References
1. “Vessel Design Manual,” ITT Industries, White Plains, N.Y. (2000).
2. “Loadings,” Paragraph UG-22, ASME Code, Sect. VIII, Div. 1, ASME, New York City (2007).
3. Young, W.C. and R. Budynas, “Roark’s Formulas for Stress and Strain,” 7th ed., McGraw-Hill, New York City (2002).
4. Brooks, C.R. and A. Choudhury, “Metallurgical Failure Analysis,” McGraw-Hill, New York City (1993).
5. “Fatigue Screening Criteria,” Table 5.9, ASME Code, Sect. VIII, Div. 2, ASME, New York City (2007).
6. Deutschman, A.D., W.J. Michels and C.E. Wilson, “Machine Design: Theory and Practice,” Macmillian, New York City (1975).
7. “Shell and Tube Heat Exchanger Specification,” PIP VESST001, Process Industry Practices, Austin, Texas (2007).
8. James, M.M. and D. O’Donnell, “When to Specify Welded, Welded and Drawn, or Seamless Tubing,” Welding Journal (June 2008). Available online at www.rathgibson.com/downloads/listing.aspx?did=59.
9. James, M.M., “Development of High Quality Welded Heat Exchanger Tubing in Lieu of Seamless,” presented at ATI Corrosion Solutions Conference, Sunriver, Ore. (2007).
10. Kearns, W.H., “Minimizing Wall Thickness Variation in Seamless Tubing,” The Fabricator, (Aug. 28, 2003), www.TheFabricator.com/TubePipeProduction/TubePipeProduction_Article.cfm?ID=678
11. “Specifications for General Requirements for Carbon, Ferrite Alloy, and Austenitic Alloy Steel Tubes,” ASME/ASTM SA/A-450, ASME, New York City (2004).
