Regulatory requirements related to greenhouse gas (GHG) emissions are mandating additional measurements at plants — for example, boiler air flow, fuel flow and their ratio. Adding a device to measure air flow may sound simple and straightforward. However, experience reveals that getting accurate readings of flow through a duct may pose challenges and surprises. So, here we'll provide some tips for success.
While we'll focus on measuring air flow in large ducts, you may apply the techniques to any fluid flowing through large ducts or pipes, i.e., those having a cross-sectional area of about 500 in.2 or greater.
One challenge that older plants often face is lack of documentation about process equipment. In addition, their ducts, fans, dampers, etc., may not have been designed to accommodate installation of additional measurement devices. Such issues can increase project risk and result in higher costs.
GETTING STARTED
A measurement and automation supplier commonly will conduct an initial site survey to document the existing setup, including whether ductwork has geometries that may affect measurement reliability and accuracy. As a result of this survey, the supplier typically recommends a customized solution that reduces project risks, identifies emissions' reductions, and estimates potential cost savings.
To maintain reliability and accuracy and mitigate project risks, installation and calibration of the measurement device should adhere to its manufacturer's guidelines. Because air flow sensors work best with uniform (or linear), fully developed flow, virtually all recommended installation practices suggest straight sections of duct before and after the meter. However, this may not be practical at many plants.
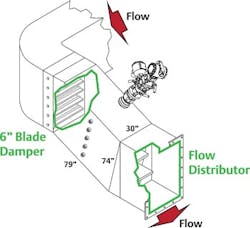
Try to identify specific potential installation location(s) with a fully developed turbulent flow profile. Unfortunately, unique duct geometries that can introduce distortion (or non-linearity) in the flow pattern and hence compromise measurement reliability and accuracy often exist. These geometries typically include elbows or bends, presence of fans and dampers in the duct, placement of manway doors and service access ports, and internal structural restrictions such as (often undocumented) support members (Figure 1). In such situations, customized solutions can compensate for the distortions.
In addition, thin-wall and fiber-glass ducts and transitional shapes (round-to-rectangle, etc.) can complicate installation.
MEASUREMENT TECHNOLOGY
A variety of devices measure flow. Options include meters using pitot tubes, orifice plates, venturis, Coriolis, vortex shedding, turbine, magnetic, ultrasonic, positive displacement and thermal dispersion. However, most of these don't come in configurations suitable for rectangular ducts. The large size of some ducts compounds the challenge. For example, it wouldn't be practical to use an orifice plate or venturi tube to measure flow in a 60 in. × 48 in. duct. On the other hand, the space and size requirements for installing turbine meters may limit their use in smaller ducts. Positive displacement devices may not make sense due to their moving parts' maintenance requirements. Thermal-dispersion meters may not provide adequate reliability and accuracy because build-up of particulate matter or corrosion may affect their sensors.
Often the best choice is an averaging pitot tube. It measures differential pressures (dPs) created by an obstruction in the flow path across multiple points within a duct, to come up with an average flow rate. (In contrast, a standard pitot-tube-based device senses pressure at a single point selected to represent the average flow velocity.) This flow rate is a function of K, a flow coefficient, and the square root of dP. The K factor is the ratio of the actual flow rate to the calculated (theoretical) flow rate. The dP is proportional to the square of the fluid velocity through the duct. Averaging-pitot-tube-based measurement provides the highest level of reliability and accuracy as well as least amount of obstruction and energy loss, and is less expensive than other technologies. Also, dP technology is widely used and understood, and requires no special service or maintenance equipment. In addition, an averaging pitot tube can be easily modified or custom tailored (e.g., in mounting hardware, sensing port locations, or multiple elements) to the specific duct application.
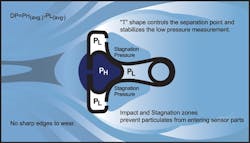
Figure 2 shows a cross-sectional view of an averaging pitot tube having a T-shaped design. The high pressure sensing port is upstream on the flat face and uses slots instead of holes to average the signal. The low pressure ports face downstream and are in a quiet zone behind the sensor face. This design also features an integral thermowell for housing a temperature sensor. The impact and stagnation zones help keep particulate matter from entering sensor ports. The T-shape controls the separation point and stabilizes the low pressure measurement. Rounded edges reduce wear on the instrument. Devices with averaging slots instead of holes measure the flow profile more accurately.
You can mount an averaging pitot tube in any number of ways, such as with a combination compression/packing type fitting, "field fitted" duct flanges or standard piping flanges.
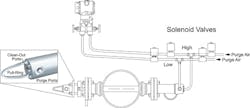
Stacks — vertical ducts having a cross-sectional area more than about 500 in.2 and a height greater than around 30 feet — can present special challenges because of particulates or condensable matter. They may require use of a "severe service" averaging pitot tube. This features large internal plenums and passages, multiple clean-out ports, and extra ports for addition of purging and draining components, if required. In applications where periodically shutting air flow to allow sensor cleaning isn't practical, a purge system can automatically clean out particulate or condensable matter. Figure 3 illustrates a severe service unit with a purge system.
DEALING WITH NONLINEAR FLOWS
An inline calibration technique called pitot traverse enables customization of the K factor to improve measurement accuracy under nonlinear flow conditions. The technique is EPA approved for conducting RATA (relative accuracy test audit) to demonstrate compliance.
Such an inline calibration system includes an averaging pitot tube permanently mounted in a duct, its secondary components, and an S-type (or Stausscheibe) pitot tube, preferably mounted in the duct about 8–16 in. upstream. You change the insertion depth of the S-type pitot tube to measure dP and temperature at various points located in a number of equal areas (referred to as centroids of equal areas) in the cross-section. Typically, you perform two traverses at right angles to each other across the diameter of the duct. For rectangular ducts, you should divide the cross-section into a number of equal rectangular areas and measure dP at the center of each. You then compare these dP reference measurements to the measurements obtained from the averaging pitot tube during the traverses to calculate a calibrated value.
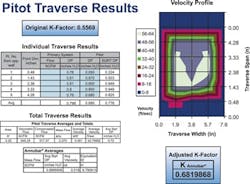
Figure 4 shows a graphical dashboard summary of the results of performing the inline calibration procedure. It led to a change in K factor to 0.6819868 from 0.5569, and thus better measurement accuracy.
However, don't assume a revised K factor from a single inline calibration procedure will accurately calculate flow under any operating condition. Most process plants change operating conditions to match marketplace demand. The air flow pattern in the duct and the K factor will vary depending on the load.
You must take several steps to achieve improved measurement accuracy under varying load conditions:
1. Obtain an initial measurement of K factor for a duct when the process is operating in one of multiple steady-state process conditions.
2. Change the process condition and measure the corresponding K factor for that condition using the pitot traverse method.
3. Repeat this procedure for each of the other steady-state conditions to obtain their K factors.
4. Apply the correct K factor for the particular process condition to calculate flow.
Best practices automatically select the K factor corresponding to current conditions.
Correcting for distortions can improve accuracy by as much as 1.5 –2%. In some situations, even 0.5% better accuracy potentially can contribute tens of thousands of dollars to the bottom line. For instance, in a boiler application, a more accurate measurement can significantly raise fuel-use efficiency and reduce energy consumption. In addition, proactive monitoring may help predict maintenance issues and extend the lifecycle of plant equipment.
GO WITH THE FLOW
As monitoring flow in ducts becomes more essential, so too does a systematic approach to meet the regulatory challenges, avoid surprises and reduce risks. Product application expertise and improved methodologies to design and install measurement devices can maximize the benefits to plant operations and the bottom line.
DAVE WINTERS is a Boulder, Colo.-based field service engineer for Emerson Process Management. AMY K. JOHNSON is director, marketing/business development, for Emerson Process Management, Chanhassen, Minn. E-mail them at [email protected] and [email protected].

